Tu carrito está vacío


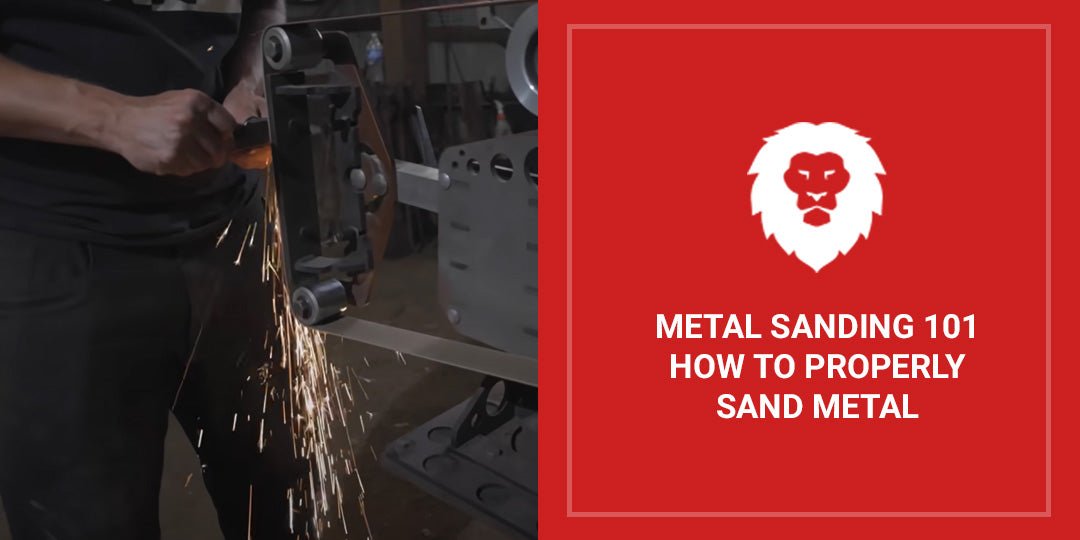
Metal Sanding 101: How To Properly Sand Metal

Quick Summary
Sanding metal is essential for achieving a smooth, even finish and preparing surfaces for painting or coating. Different metals, like aluminum, steel, and stainless steel, require specific sanding techniques and grit levels to avoid damage and ensure a quality result. Tools such as sandpaper, power sanders, and lubricants play a crucial role in the sanding process, with each tool suited to different tasks. Selecting the right abrasive, such as aluminum oxide, zirconia, or ceramic, is key to efficient sanding, especially for tougher metals. Proper maintenance of sanding tools, including regular cleaning and correct storage, ensures longer-lasting performance and better results.
Sanding is a key step in many metalworking projects. It helps remove imperfections, rust, and old paint from metal surfaces, leaving them smooth and ready for the next stage of your project. It also improves the adhesion of primers, paints, and other coatings and can even be used to create artistic textures like a brushed or swirling effect.
Like any other material, however, there are certain tools and techniques you need to use with metal to achieve the results you’re looking for. In this guide, the team at Red Label Abrasives will walk you through everything you need to know, from selecting the right tools and abrasive materials to applying the correct techniques for various types of metal.
Tools and Materials for Sanding Metal
The tools you choose will depend on the size and type of metal you’re working with, as well as the desired finish. Generally speaking, you’ll need the items and materials listed below.
Sandpaper
For metal, you’ll generally start with a coarser grit (60-80) to remove rust, old paint, material, or rough edges. As you progress, move to medium grits (120-180) to smooth the surface, and then to finer grits (220-240) for the final touches. The type of sandpaper you choose is also important. Closed coat sandpaper, which has a dense grain coverage, is ideal for sanding metal as it provides a more aggressive cut rate with a consistent finish.
Power Sanders
For larger surfaces or more extensive work, a power sander can save time and effort. Orbital sanders are versatile and can be used for both coarse and fine sanding, while belt sanders are powerful and ideal for removing large amounts of material quickly. Angle grinders, equipped with sanding discs, are excellent for reaching tight corners and hard-to-access areas.
Protective Gear
Metal sanding produces dust and debris that can cause health problems if inhaled or absorbed through the skin. To protect yourself, always wear safety glasses to shield your eyes, a dust mask to prevent inhalation of metal particles, and gloves to protect your hands from sharp edges and abrasive materials.
Lubricants
When sanding metal, especially with finer grits, use lubricants such as water or oil to reduce friction and heat. This is important because excessive heat can cause the metal to warp, and friction can clog the sandpaper, reducing its effectiveness. Wet sanding, where the sandpaper is dipped in water or sprayed with a light mist, is particularly useful for achieving a smooth, polished finish on metals like aluminum, copper, and stainless steel.
Step-by-Step Guide to Sanding Metal
Now that you have your materials ready, it’s time to get started!
1. Clean the Metal Surface
Before sanding, use a degreaser or a mixture of water and mild detergent to remove any oil, dirt, or grease that could interfere with the sanding process. This ensures that the sandpaper makes direct contact with the metal, allowing for more efficient sanding. Once the surface is clean, dry it thoroughly with a clean cloth or let it air dry before moving on to the next step.
2. Choose the Right Sandpaper Grit
Coarse grits (60-80) are ideal for removing rust, old paint, or rough edges while medium grits (120-180) are better for smoothing out the surface, and fine grits (220-240) are used for finishing touches. It’s important to choose the right grit for the task at hand, as using the wrong one can result in an uneven finish or damage to the metal.
- For Heavy Rust, Stock Removal, or Paint Removal: Start with 60-80 grit sandpaper. This coarse grit will help you quickly remove surface imperfections and prepare the metal for further sanding.
- For Smoothing Edges and Surface Preparation: Use 120-180 grit sandpaper. This medium grit will help to smooth out any rough edges and create a more even surface.
- For Final Finishing: Finish with 220-240 grit sandpaper. This fine grit will give the metal a smooth, polished finish, ready for painting or coating.
3. Start Sanding with a Coarse Grit
Begin with the coarsest grit necessary for the job and apply even pressure as you move the sandpaper in a circular or back-and-forth motion across the metal surface. The goal is to remove surface imperfections and create a uniform base for further sanding. If you’re using a power sander, make sure to keep the tool moving to avoid creating deep scratches or gouges. For edges or detailed areas, you may need to switch to hand sanding with a sanding block or sponge. This allows you to get into tight spots and control the pressure more effectively.
4. Progress to Finer Grits
Once the initial sanding is complete, move to a finer grit to smooth out the surface. The goal is to gradually remove the scratches left by the coarser grit and create a uniform surface. As you work, periodically wipe down the metal with a clean cloth to remove dust and check your progress. This helps you see if there are any areas that need more attention. Depending on the desired finish, you may need to repeat the process with progressively finer grits until you achieve the smoothness you want.
5. Use Lubricants for a Smoother Finish
When you’re sanding with fine grit sandpaper, especially on softer metals like aluminum or copper, consider using water or oil as a lubricant. This reduces friction and heat, which can cause the metal to warp or the sandpaper to clog. Wet sanding, where you dip the sandpaper in water or spray a light mist on the metal surface, is particularly effective for achieving a smooth, polished finish. For metals like stainless steel, applying a light coating of oil can help achieve a mirror-like finish.
6. Inspect and Finish
Once you’ve sanded the metal to the desired smoothness, inspect the surface for any remaining imperfections. If necessary, go over those areas with fine grit sandpaper to ensure a consistent finish. After sanding, wipe the metal surface with a clean, damp cloth to remove any remaining dust and debris. For a high-gloss finish, you may choose to polish the metal using a suitable polishing compound- polishing not only enhances the appearance of the metal but also adds an extra layer of protection against corrosion and wear.
Tips for Sanding Different Types of Metal
Different metals have unique characteristics, which means your sanding approach should be tailored accordingly. Here are some tips for sanding specific metals.
Aluminum
Aluminum is soft and prone to scratching, so it’s important to use finer grits and less pressure. Start with a medium grit (120-150) and progress to a fine grit (220-240) for finishing. Wet sanding is particularly effective with aluminum to avoid overheating and warping. Additionally, because aluminum tends to clog sandpaper quickly, be sure to use sandpaper designed for metal and consider using a lubricant to keep the sandpaper clean.
Steel
Compared to aluminum, steel is stronger and can handle coarser grits and more aggressive sanding. If you’re removing rust or paint, start with a coarse grit (60-80) and work your way up. Be sure to keep the surface cool to prevent any heat-induced warping. When sanding steel, it’s also important to keep the sandpaper moving to avoid creating hot spots, which can lead to discoloration or warping.
Stainless Steel
Stainless steel requires careful handling to maintain its polished finish. Start with a fine grit (220) and use a lubricant to achieve a smooth surface. Avoid using steel wool, as it can leave particles that may rust. For the best results, sand in the direction of the grain to maintain the metal’s natural appearance. If you’re looking for a mirror-like finish, you may need to follow up with a polishing compound after sanding.
Copper and Brass
These metals are soft and easily scratched, so use finer grits (220-240) and gentle pressure. Wet sanding is recommended to prevent clogging and maintain the metal’s luster. Because copper and brass are prone to tarnishing, it’s a good idea to polish these metals after sanding to restore their shine. If you’re working with intricate designs, take your time and use small, precise movements to avoid damaging the details.
Common Mistakes to Avoid
When sanding metal, there are a few common mistakes that can ruin your project or damage the material. Here’s what to watch out for:
- Skipping Grits: Jumping from a coarse grit to a fine one without progressing through the intermediate stages can leave deep scratches that are difficult to remove. Always work your way through the grits gradually to achieve a smooth finish. If you skip a stage, you may end up spending more time trying to correct the damage, and the final result may not be as smooth or polished as you’d like.
- Applying Too Much Pressure: Pressing too hard can create uneven surfaces and deep scratches or even cause the metal to warp. Use moderate pressure and let the sandpaper do the work. Remember- sanding is a gradual process, and applying excessive force can lead to more harm than good. If you find yourself pressing hard to remove material, it might be time to switch to a coarser grit sandpaper.
- Overheating the Metal: Sanding generates heat, which can warp or discolor the metal. To avoid this issue, take breaks, use lubricants, and keep the sandpaper moving. Overheating is particularly problematic with softer metals like aluminum, which can warp easily. If you notice the metal becoming warm to the touch, stop and let it cool down before continuing.
Best Abrasive Types for Metal
Choosing the right abrasive material is just as important as selecting the correct grit, as different materials are better suited for different types of metal and applications. Here are three of the most commonly used abrasive types for metal sanding.
Closed Coat Aluminum Oxide
Aluminum oxide is one of the most popular abrasives for sanding metal. It’s durable, versatile, and can be used on a wide range of metals, including steel, aluminum, and brass. Closed coat aluminum oxide sandpaper has a dense grain coverage, which makes it highly effective at removing material quickly. It’s especially good for sanding hard metals like steel, as it can withstand the heat and pressure generated during the sanding process.
One of the key benefits of aluminum oxide is its self-renewing properties. As you sand, the abrasive grains break down, exposing fresh, sharp edges that continue to cut effectively. This makes aluminum oxide a long-lasting choice for metal sanding, particularly when working with tougher metals.
Zirconia
Zirconia, also known as zirconium dioxide, is harder and more durable than aluminum oxide, making it ideal for heavy-duty applications. Zirconia abrasives are commonly used when rapid material removal is required. They’re also particularly well-suited for working with stainless steel and other hard metals. Finally, zirconia is known for its long lifespan, which makes it a cost-effective choice for large projects.
Ceramic
Ceramic abrasives are the most durable and long-lasting option for metal sanding. They’re extremely hard and can handle the most demanding sanding and grinding tasks, which is why ceramic abrasives are commonly used in industrial applications where high pressure and heat are involved. They’re ideal for sanding and grinding tough metals like stainless steel, titanium, and alloys.
One of the standout features of ceramic abrasives is their ability to stay sharp even under extreme conditions. They’re designed to cut aggressively and maintain their effectiveness over a long period. While ceramic abrasives are typically more expensive than aluminum oxide or zirconia, their durability and cutting power make them a worthwhile investment for heavy-duty metalworking.
When to Use Power Tools vs. Hand Sanding
The decision to use power tools or hand sanding depends on the size of the project, the type of metal, and the desired finish. Both methods have their advantages, and understanding when to use each can help you achieve the best results.
Power Tools
- Larger Surfaces: For large, flat surfaces, power sanders like orbital sanders or belt sanders can save time and effort. They’re ideal for quickly removing material and creating a uniform finish.
- Heavy Material Removal: When you need to remove a lot of material, such as rust or old paint, power tools are more efficient. They can handle tougher jobs and provide a more consistent finish across large areas.
- Uniform Finish: Power sanders can help achieve a consistent finish across larger areas, reducing the likelihood of uneven sanding or visible scratches.
Hand Sanding
- Detailed Work: For edges, corners, and intricate details, hand sanding provides better control and precision. It allows you to focus on specific areas and avoid over-sanding delicate parts.
- Soft Metals: Hand sanding is ideal for softer metals like aluminum or copper, where too much force can cause damage. It gives you more control over the pressure applied, reducing the risk of scratches or warping.
- Final Finishing: Hand sanding with fine grits is often used for the final touches to achieve a smooth, polished surface. It’s the best way to create a high-quality finish that enhances the metal’s appearance.
How to Maintain Your Metal Sanding Tools
Regular care and attention can extend the life of your tools and help you achieve better results. Here are some tips for keeping your tools in top shape.
Sandpaper
- Avoid Clogging: Use lubricants like water or oil when wet sanding to prevent sandpaper from clogging. If you’re dry sanding, tap the sandpaper regularly to remove dust and debris.
- Store Properly: Keep sandpaper in a dry, cool place to avoid moisture damage. Moisture can weaken the adhesive backing and cause the abrasive material to degrade, reducing its effectiveness.
Power Sanders
- Clean Regularly: After each use, clean your power sander to remove metal dust and debris that can accumulate in the motor or on the sanding pad. This helps prevent overheating and ensures smooth operation.
- Check Attachments: Inspect sanding pads, belts, or discs for wear and replace them as needed. Worn attachments can lead to uneven sanding and may damage the metal surface.
- Lubricate Moving Parts: If your sander has moving parts that require lubrication, be sure to follow the manufacturer’s guidelines for maintenance. Proper lubrication reduces friction and wear, prolonging the life of the tool.
Get Your Metal Sanding Supplies at Red Label Abrasives
By selecting the right tools and materials, applying the correct techniques, and avoiding common mistakes, you can achieve a smooth, even finish on your metalworking projects. At Red Label Abrasives, we sell a variety of industrial-grade sanding sheets, sanding belts, and sanding discs that are designed to deliver outstanding results on all types of metals. If you have questions about our abrasives or would like to place an order, call 844-824-1956 or fill out our contact form today.


Our Most Popular Abrasives

EdgeCore Ceramic Sanding Belts

EdgeCore Ceramic Flap Discs

Buffing Kit
Shop By Product Category


Why Choose Red Label?

