Your Cart is Empty


What Is A Knife Choil & How Do You Make One?

Quick Summary
A knife choil is a small but essential feature at the base of a knife's blade where it meets the handle. The choil serves functional and aesthetic roles, impacting cutting performance, balance, and safety. The article provides a step-by-step guide for creating or modifying a choil, highlights the importance of proper maintenance, and offers tips for choil design and functionality. It also discusses various sharpening systems to restore a knife's edge after modification.
A knife choil is a small, semi-circular, or rectangular indentation or groove that can be found at the base of the blade where it meets the handle. This seemingly unassuming feature serves a key purpose in the overall functionality and safety of a knife. While it may be small in size, the knife choil can have a significant impact on how the knife handles, its durability, and even its aesthetic appeal.
Think of the knife choil as the junction between the blade and the handle, a transition point where form meets function. Its design and execution require careful attention because a well-crafted choil can enhance the knife's balance, ease of use, and safety, while a poorly executed one can lead to discomfort, reduced control, and even accidents during food preparation.
In this blog, the team atRed Label Abrasives will go over the key aspects of a knife choil, including its functions, the types of choils you may encounter, and the steps involved in making one. Whether you're a seasoned chef, an avid outdoors person, or simply a knife enthusiast, understanding the importance of a well-crafted choil can elevate your appreciation for the knives you use every day.
Understanding the Anatomy of a Knife
The anatomy of a knife, in its simplest form, consists of three primary parts: the blade, the handle, and, of course, the choil. Let's take a closer look at each of these components.
The Blade
The blade is the business end—the part that does the cutting. Blades come in various shapes, sizes, and materials, each tailored to specific tasks and cutting techniques. Common blade shapes include:
- Chef's Knife Blade: This versatile blade is typically eight to ten inches long, with a wide, curved belly that makes it ideal for slicing, dicing, and chopping.
- Paring Knife Blade: Smaller and more pointed, the paring knife blade is perfect for precise tasks like peeling, trimming, and intricate cutting.
- Serrated Blade: Often found on bread knives, serrated blades have tooth-like edges that excel at slicing through crusty bread without squishing it.
- Cleaver Blade: Known for its large, rectangular shape and heft, cleaver blades are designed for heavy-duty tasks like breaking down meat and chopping bones.
The Handle
Knife handles come in a variety of shapes, materials, and styles, allowing you to choose one that suits your hand size and personal preference. Common handle materials include wood, bone, stainless steel, and composite materials.
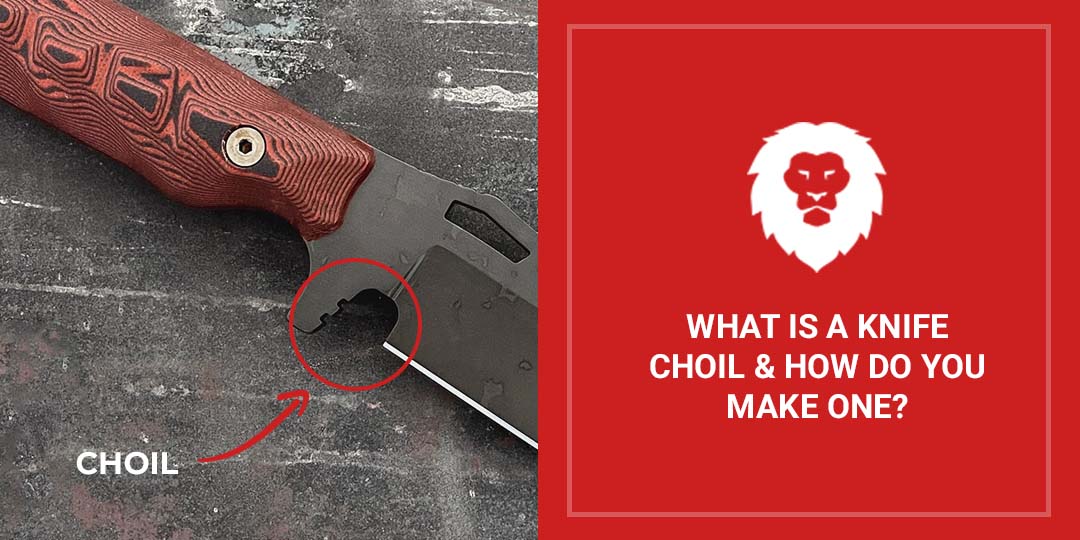
The Choil
The choil is located at the base of the blade where it meets the handle. It can take different forms, and its design varies depending on the type of knife and its intended use. Here are some common types of choils you may encounter:
- Unsharpened Choil: In many knives, especially chef's knives and utility knives, the choil is intentionally left unsharpened or rounded. This design choice prevents the sharpened edge from coming into direct contact with the handle, reducing the risk of accidental cuts to the user's fingers.
- Finger Choil: Some knives feature a choil that is more pronounced, with a semi-circular or rectangular cutout. This finger choil allows users to place their index finger comfortably for added control and precision during intricate tasks.
- Sharpened Choil: In certain specialized knives, like boning knives, the choil might be sharpened to a fine edge. This enables users to get closer to the bone or perform precise cutting tasks where the tip of the blade is crucial.
- Front Choil:Front choils are commonly found on many folding knives, especially those designed for everyday carry or utility purposes. By allowing the user to grip the blade closer to the cutting edge, the front choil increases the knife's versatility and usability.
- Integral Choil:An integral choil, often referred to as an "integral finger choil," is seamlessly integrated into the blade and handle of a knife. They are typically found on fixed-blade knives, where the blade and handle are made from a single piece of material.
The choil of a knife plays both functional and aesthetic roles, and its design can significantly impact cutting performance, balance, and safety.
- Cutting Performance: The choil can have a substantial influence on how the knife cuts. In knives with a finger choil, placing the index finger in the choil allows for precise control over the blade, especially when performing intricate or detailed cutting tasks. It enables users to work with fine accuracy, such as slicing paper-thin vegetable slices or making delicate cuts on meat.
- Balance: The choil also affects the balance of the knife. Depending on its design and placement, it can shift the knife's center of gravity closer to the handle or the blade, affecting how it feels in the hand. A well-balanced knife is easier to control and maneuver, contributing to overall cutting efficiency.
- Safety: Safety is a crucial function of the choil. By providing a designated space for the index finger, it prevents the hand from accidentally slipping forward onto the sharp edge of the blade during use. This reduces the risk of cuts and accidents, making the knife safer to handle.
The choil can also be a defining feature that adds character and style to the knife, showcasing the craftsmanship of the maker. As such, it's a small but crucial element that contributes to the overall excellence of a well-crafted knife.
How to Make a Knife Choil
Creating or modifying a choil in a knife involves careful planning, precise execution, and close attention to safety. Whether you are a custom knife maker looking to add this feature to your creation or a user seeking to modify an existing knife, here's a step-by-step guide.
Materials and Tools:
- The knife to be modified or the knife blade to be integrated (if you're making a custom knife).
- Safety gear, including safety goggles, dust mask, and ear protection.
- Bench vise or clamps to secure the knife during work.
- Files (various grits) or a belt sander/grinder.
- Measuring tools, such as calipers or a ruler.
- Pencil or marking tool for layout.
- Drill and bits (if needed for creating a finger choil).
- Sandpaper (various grits) for finishing.
- A sharpening system to restore the knife's edge after modification.
Once you’ve assembled everything and put on your safety gear, take the steps outlined below.
Secure and Mark the Knife
If you are modifying an existing knife, secure it in a bench vise or use clamps to keep it steady during work. If you are making a custom knife, ensure the blade is securely mounted in place. Then use a pencil or marking tool to outline the choil's shape and size on the blade. Pay careful attention to the position and dimensions, as this will impact the knife's balance and functionality. Take precise measurements if necessary.
Cut or Grind
Depending on your skills and available tools, you can either cut out the choil using a hacksaw or similar tool or grind it using a belt sander or grinder. Start with coarse abrasives like files or rough sandpaper (around 60 to 120 grit) to remove material quickly and shape the initial contours of the choil. These are particularly useful when you are removing larger amounts of metal, such as when creating the basic choil outline.
Pro Tip:If using power tools, move slowly and steadily to avoid overheating the blade and compromising its temper. Keep checking your progress against your marked guidelines.
File and Shape
After roughing out the choil, refine the shape using files. Start with a coarser file or abrasive and gradually move to finer grits to achieve a smooth and even finish. As you progress, switch to intermediate grits (around 180 to 400 grit) to refine the shape and smooth out rough surfaces. These abrasives help in achieving a more precise and even choil shape. Pay close attention to the inside edges of the choil to prevent sharp corners that could pose safety risks.
Finish and Smooth
Use sanding sheets of progressively finer grits to further smooth and refine the choil's surfaces. This step is crucial for ensuring that there are no rough edges or burrs that could cause discomfort or injury during use. Use fine abrasives (above 400 grit and up to 1000 or more) to achieve a polished and smooth choil. Fine abrasives remove any remaining imperfections, burrs, or scratches, ensuring the choil is comfortable to touch and use.
Pro Tip:If you are creating a finger choil that extends into the blade, you may need to drill a hole to complete the choil's shape. Ensure the hole is precisely aligned with your design and is appropriately sized for your finger.
When you’re done, thoroughly inspect the choil to ensure it meets your design specifications and safety standards. Remove any metal shavings or debris from the blade and choil area.
Restore the Edge
When you modify a choil on a knife, whether by cutting, grinding, or filing, you are altering the blade's geometry and, in some cases, even removing material from the cutting edge. This process can inadvertently dull the blade, which is why using a sharpening system becomes crucial to restore the knife's optimal sharpness. Here are some common options:
- Sharpening Stones: Sharpening stones, also known as whetstones, are traditional tools for knife maintenance. They come in various grits, ranging from coarse to fine, allowing you to start with a coarser stone to reshape the edge and then progress to finer stones for honing and polishing. Sharpening stones require some skill to use effectively, as you must maintain the correct angle and consistent pressure while sharpening.
- Honing Rods or Steels:Honing rods, often called sharpening steels, are metal rods with a handle used for honing rather than sharpening. They don't remove material from the blade but realign the edge, keeping it straight and sharp. Honing should be a regular part of knife maintenance and can be done before or after using the knife.
- Electric Knife Sharpeners:Electric knife sharpeners are user-friendly and efficient tools that can quickly restore a dull blade. They use rotating abrasive discs or belts to sharpen the knife. Some models have multiple sharpening stages, including coarse, medium, and fine, to achieve a polished edge. However, they may not be suitable for extremely delicate knives or high-end blades, as they remove material more aggressively.
- Guided Sharpening Systems:Guided sharpening systems consist of a sharpening stone or abrasive rod attached to a fixed-angle guide. These systems help maintain a consistent sharpening angle, making them ideal for beginners or those who want precise control over the sharpening process. They are available in manual and electric versions.
- Bench Stones with Angle Guides: Bench stones are large sharpening stones that can be placed on a workbench or table. Some come with angle guides or jigs that help maintain the correct sharpening angle. They provide a stable platform for more extensive knife maintenance and are favored by experienced sharpeners.
Sharpening brings the edge back to its optimal sharpness, ensuring the knife performs its cutting tasks effectively and efficiently. It also helps maintain the knife's original balance and can even extend the lifespan of your knife by preventing premature wear and damage.
Test and Adjust
Before putting the knife into regular use, test it carefully to ensure that the choil serves its intended purpose without discomfort or safety concerns. Make any necessary adjustments if you're not satisfied with the results.
Tips for Choil Design and Functionality
When designing a choil, begin by determining the knife's intended use. Different types of knives, such as chef's knives, paring knives, and utility knives, may require different choil designs to suit their specific functions. Other considerations include:
- The choil should be designed with user comfort in mind. Ensure that the shape and size of the choil allow for a secure and comfortable grip. It should not cause discomfort or hot spots on the user's fingers.
- When creating a finger choil or any type of choil, avoid sharp edges or corners within the choil area. These can lead to discomfort and potential injuries when using the knife.
- Be mindful of the choil's size and placement in relation to the knife's overall balance. Removing too much material or placing the choil too close to the handle can disrupt the knife's balance, affecting its handling and performance.
- Before finalizing the choil design on a custom knife or making modifications, create a prototype or mock-up to test its functionality. This allows you to make adjustments if needed.
- The size of the choil should be proportionate to the knife's blade. A choil that is too large can weaken the blade, while one that is too small may not provide adequate control.
Remember that choil design is both an art and a science. With practice and experimentation, you can refine your skills to create exceptional knives.
Choil Maintenance and Care
A well-maintained choil not only ensures optimal performance but also prolongs the life of the knife. After each use, thoroughly clean the knife, paying particular attention to the choil area. Remove any food residues, oils, or debris that may have accumulated. Use warm soapy water and a soft brush or cloth to clean the choil. Always dry the knife completely after washing to prevent corrosion. Moisture can lead to rust, especially in the choil area where it's harder to spot.
Other tips:
- Regularly use a honing rod or sharpening steel to maintain the knife's edge alignment. Honing doesn't remove metal but straightens the edge, keeping it sharp.
- Periodically sharpen the knife using an appropriate sharpening system, as described earlier. Maintaining a sharp edge reduces the risk of accidents and ensures efficient cutting.
- Regularly inspect the choil for any signs of damage, such as nicks or dings. Address any issues promptly to prevent further deterioration.
- Store your knife in a knife block, magnetic strip, blade guard, or knife roll to protect the choil and blade from damage and to ensure safety when handling the knife.
If you're unsure about choil maintenance or if your knife requires extensive maintenance or repair, consider seeking the services of a professional knife sharpener or restorer.
Make Your Choil With Premium Quality Abrasives
For those interested in modifying or creating a choil in their knives, the step-by-step guide provided here offers valuable insights into the process. From planning and marking to shaping and finishing, careful execution and attention to detail are key to achieving the desired choil design. You’ll also want to be sure that you use the right tools, including industrial-grade abrasives. Red Label carries the premium quality sanding sheets you’ll need to sand your choil.
Red Label Abrasives has been serving the knife industry for over 35 years. We manufacture sanding belts made specifically for knife making. We can provide you with the sanding discs, sanding belts, and sanding sheets necessary to achieve precision and excellence in your knife crafting endeavors. If you have questions or would like to place an order, call 844-824-1956 or fill out our contact form today!


Belt Packs Made For Knife Makers

2 X 72 Inch Knife Makers Sanding Belts Assortment

2 X 60 Inch Knife Makers Sanding Belts Assortment

2 X 48 Inch Knife Makers Sanding Belts Assortment

2 X 36 Inch Knife Makers Sanding Belt Assortment

2 X 42 Inch Knife Makers Sanding Belts Assortment

1 X 30 Inch Knife Makers Sanding Belts Assortment

1 x 42 Inch Knife Makers Sanding Belt Assortment
Shop By Product Category


Why Choose Red Label?

